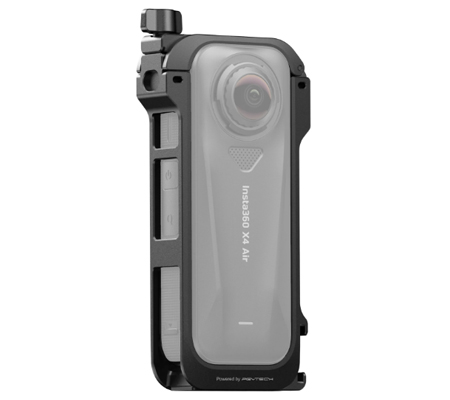
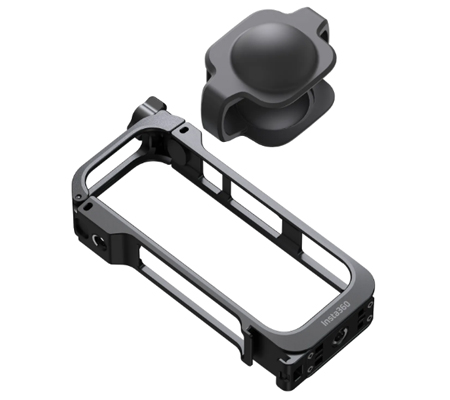
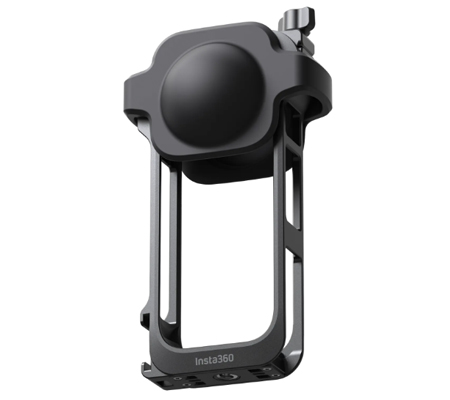
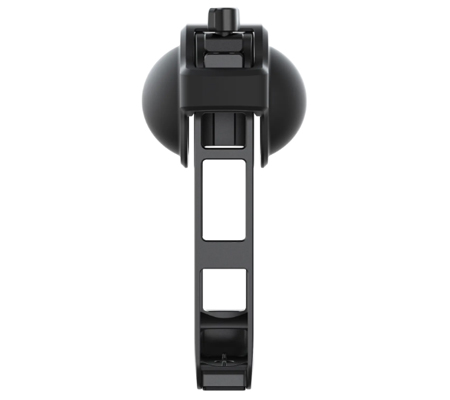
All-metal frame with reliable screw-lock design and lens cap for solid protection.
Lightweight armor.
Tough doesn't have to mean heavy. The upgraded design keeps your setup light, so you can shoot for longer.
Full flexibility.
The cold shoe mount lets you add your favorite accessories—like a mic or light—without weighing down your rig.
Switch up in seconds.
The quick-release and 1/4" mounting points keep things versatile. Easily switch between horizontal and vertical shots in a flash.
Wind? No worries.
Mic Windshields made of premium acoustic foam cut through wind noise for crisp, clean sound, even at high speeds.
Specs
Weight: 55g (1.94oz)
Dimensions:
123.5x61.3×20.8mm (4.9×2.4x0.8in)
Material:
Aluminum alloy, silicone, acoustic foam
How to Use
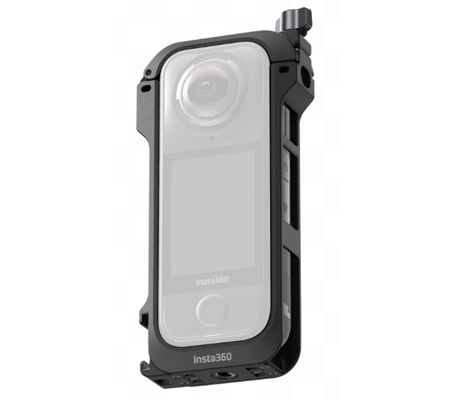
1. Turn the screw counterclockwise (1) to unlock the Utility Frame. Pull upwards on the top to open (2) and insert the camera as shown, ensuring that the 1/4" mounting point on the bottom aligns with that of the Utility Frame (3). Then, close the Utility Frame and turn the screw clockwise (@) to lock securely.
2. Use the Lens Cap to protect the lenses when the camera is not in use (3).
3. You can attach the Utility Frame to accessories such as a selfie stick by using the quick release or 1/4" mounting point at the bottom.
4. The Utility Frame has a cold shoe mounting point on the side to attach external microphones and other accessories. It also has a 1/4" mounting point on the side to attach additional accessories and position the camera horizontally.
5. Install the included Mic Windshields onto the Utility Frame to reduce wind noise.
Notes*
1. Only insert the camera into the Utility Frame in the method shown in this manual. When done correctly, the camera's battery and USB covers can be opened without removing the Utility Frame.
2. Ensure the 1/4" mounting point at the bottom of the camera is correctly aligned with the mounting point of the Utility Frame. It should not be at an angle.
3. After installation, ensure the screw at the top of the Utility Frame is securely locked.
4. When there is no need for noise reduction, remove the Mic Windshields from the Utility Frame to prevent damage or loss.
5. Do not use the Mic Windshields in wet conditions, as dampness may affect wind noise reduction.
6. When not in use, store the Mic Windshields in a dry environment to avoid dampness and moisture.


_-_1TB_7.jpg)